Thru-deck repair at bow pulpit mounts

Tips, Tricks, and Secrets to rigging a San Juan 21
Post Reply
Ben G
Posts:24
Joined:Tue Apr 05, 2011 6:02 pm
Thru-deck repair at bow pulpit mounts

Post by Ben G » Wed Sep 26, 2012 11:55 pm

Hi all,

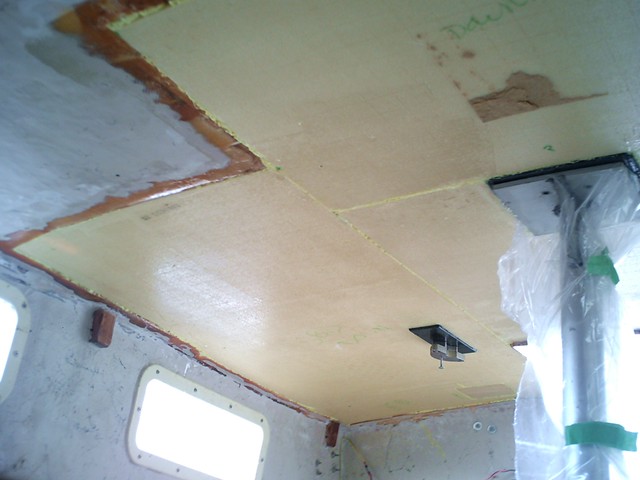
The photo is the overhead, starboard side toward the bow, where I've removed the 3 bolts for that pulpit mount on my MK-II. The reason for removing the pulpit was suspected water infiltration at the mounting bolts which was confirmed -- brown wet mush. The first sign of trouble was one of the bolts starting to pull through the over head and more stress cracks around the area of all 3 bolts. Fortunately, we've had good drying conditions for a few days and after clearing the holes with a bent-nail-on-drill, I set up a fan to move air throught the holes for the past 72 hrs. Now, all seems dry. For the worst hole where the bolt was pulling thru, I enlarged that hole for repair and for a better inspection. I encountered no signs of moisture and the remaining balsa seems firm. The hole that I enlarged is the most outboard, at the edge of the balsa core where it transitions to all fiberglass. There's no spongy deck. So, what should I do next?
Image

I'd like to think, this is ready to fill with resin, drill, and remount the pulpit with sealant. But hesitation stems from wondering if it's dry enough. If I seal up moisture at this point, will there be regrets?

And FWIW, the other pulpit mount points also had brown wet mush when the bolts were removed, but no spongy deck and are now dry.

When I bought the boat, I asked whether the thru-deck fittings had been epoxy back-filled and was assured they were, but alas no. Sealant was used with the bolts and has failed with aging. Boat has been under tarps, but the pulpit is exposed. Bulkheads were rotten, so I've already replaced chain plates with proper bedding and no issues thru the balsa core in that area.

I'd like to remount the pulpit, sail thru the fall (storing the boat under tarps), and later in the winter, commence with refitting the remaining thru deck hardware.

Thoughts and suggestions, please!
Ben Gibson/'77 Mk-II/#1864/cruiser/Greenville, SC

User avatar
San Juan Sailboats
Posts:50
Joined:Fri Mar 25, 2011 10:36 pm
Location:Seattle WA
Contact:

Re: Thru-deck repair at bow pulpit mounts

Post by San Juan Sailboats » Thu Sep 27, 2012 2:24 am

If you mount a backing plate inside, make a bushing that will go into the hole with the ID the bolt size. A little sealant on the top should keep the moisture away for the rest of the season.
Stephen Jensen

San Juan Sailboats
Stephen@SJSailboats.com

Ben G
Posts:24
Joined:Tue Apr 05, 2011 6:02 pm

Re: Thru-deck repair at bow pulpit mounts

Post by Ben G » Thu Sep 27, 2012 2:35 am

Stephen, Your quick fix is appealing except that it's temporary. Fibergalss materials are on hand, whereas making bushings is not my forte. Thus, I'm inclined to fill with fiberglass resin. Backplates are a good idea, but may go with large heavy washers for expedience and fab backplates at a later time.

You did not raise a red flag regarding residual moisture, so I'm feeling better about that.
Ben Gibson/'77 Mk-II/#1864/cruiser/Greenville, SC

User avatar
San Juan Sailboats
Posts:50
Joined:Fri Mar 25, 2011 10:36 pm
Location:Seattle WA
Contact:

Re: Thru-deck repair at bow pulpit mounts

Post by San Juan Sailboats » Thu Sep 27, 2012 5:11 am

Yes, it's a temp fix. The more time you give it to dry, the better
Stephen Jensen

San Juan Sailboats
Stephen@SJSailboats.com

User avatar
Diarmuid
Posts:53
Joined:Thu Jun 09, 2011 8:13 pm
Location:Laramie, WY

Re: Thru-deck repair at bow pulpit mounts

Post by Diarmuid » Thu Sep 27, 2012 6:06 pm

Personally, I'd say fix it once and for good. If you start cutting out core from below, you'll soon learn the extent of wet balsa. Begin small & work outward, esp. aft, until you find dry wood. Then you can shape pieces of solid core material (I like phenolic) to the cavity, glue them against the outer skin with thickened epoxy, glass the repair to the inner skin, and thru-bolt to suit. If you use phenolic, washers under the nuts are sufficient. If you just plug the holes or add a plywood core, I advise an oversized backing plate. We put 1/4" aluminum under our pulpit stanchions. We also added 'open shuts' (cold shuts) to one bolt for slinging stuff off. I'll try to get a photo later. The pulpit is an important 'grabber' item that people expect to stay put.

(Note: we have a Mk1, with no core in the side decks under the pulpit. But we re-bedded the foredeck cleat and all other high-load deck hardware from beneath, using phenolic backing. The way to make sure the moisture is totally gone is to remove all balsa that ever got wet.:))

kuriti
Posts:243
Joined:Tue Sep 13, 2011 12:48 am

Re: Thru-deck repair at bow pulpit mounts

Post by kuriti » Fri Sep 28, 2012 11:56 am

Diarmuid is right in the long term. Short term, I would chip out as much wood as possible using increasingly longer nails. Then duct tape the holes from below and fill with epoxy, leaving it for a few minutes to absorb into adjoining wood. Then suck out excess epoxy using syringe and add colloidal silica to your pot until you get a mayonnaise consistency. I found sucking excess out easier than poking a hole in the tape and re-taping. Refill holes with mayo and let dry, then re-drill your holes. I did this to all through deck holes last year after also finding previous owner lied about said job. It sucked, but 90% of my deck is dry balsa and i mean to keep it that way.

Ben G
Posts:24
Joined:Tue Apr 05, 2011 6:02 pm

Re: Thru-deck repair at bow pulpit mounts

Post by Ben G » Mon Oct 01, 2012 8:54 pm

Good stuff!
Aluminum is easy enough to work with, so I'll check that box.
Cold shuts, also.
Sucking vs draining -- next time for sure! LOL...
THANK YOU!!!
Ben Gibson/'77 Mk-II/#1864/cruiser/Greenville, SC

User avatar
Diarmuid
Posts:53
Joined:Thu Jun 09, 2011 8:13 pm
Location:Laramie, WY

Re: Thru-deck repair at bow pulpit mounts

Post by Diarmuid » Tue Oct 02, 2012 4:44 pm

kuriti wrote:Diarmuid is right in the long term. Short term, I would chip out as much wood as possible using increasingly longer nails. Then duct tape the holes from below and fill with epoxy, leaving it for a few minutes to absorb into adjoining wood. Then suck out excess epoxy using syringe and add colloidal silica to your pot until you get a mayonnaise consistency. I found sucking excess out easier than poking a hole in the tape and re-taping. Refill holes with mayo and let dry, then re-drill your holes. I did this to all through deck holes last year after also finding previous owner lied about said job. It sucked, but 90% of my deck is dry balsa and i mean to keep it that way.
This is a useful approach & should work very well to get you sailing. Tho I hate the 'spinning nail' method of core removal. It's popular, but.... Ooof. Any core rotten enuf to be excised that way is guaranteed to have core just as wet to all sides of it. And heaven help your wrists if you tie into some un-wet balsa. The drill will kick like a mule! Having now replaced nearly all the balsa core on our Mk1 -- first temporarily & locally, as you describe, then globally from below -- I have found there is very, very little difference in time or nastiness between spot repairs and wholesale repairs. It is nearly as much hassle to remove & plug the immediate rot as to cut out ALL the wet core around the stanchions and replace it with good.

Strange, but true. :) It took two days to effect a "good-enuf-fer-now" fix of leaks around the winches, jib tracks, and grab rails. It took three days to completely peel the inner skin, glue in Core Cell and phenolic, and re-glass the roof (which is not pleasant work). Had to wait a couple more days to re-drill and bed the deck hardware, and a week or so to paint the interior.

Image

Image

But the thing is, it's DONE. Done for all time. And some of those temporary repairs I had performed ... the drill and fill plug jobs? Some didn't look so good when we removed the skin. They had lots of voids, incomplete bonding, and left plenty of wet balsa to the sides, spreading yuck everywhere. The temp repairs did complicate removing the inner skin and cleaning up the outer during the proper fix. :lol: Had to chisel off a few epoxy bushings that bonded all too well.

Post Reply